First Books

img_2577I didn’t really think about them as books, certainly not artist books. They were just compilations of photographs. The first book, which no longer exists, was created in 1963 or 1964. We took a trip to the East Coast going from Gettysburg and Williamsburg to Cape Cod. This book contained photographs of Victorian houses on Cape Cod. I didn’t know anything about making books or using archival materials. A few years ago I found that the book had aged badly, filled with brittle and yellowed pages. I think I removed the pictures but don’t remember where I put them.

In 1969 we took a trip to Europe and Israel. I was a student at the Art Institute of Chicago and had already taken several years of photography classes. So the books are intact, although not in very good condition. They are too thick for the spiral binding, which threatens to come undone. The photos are beautifully printed and mounted; I was an expert darkroom technician. However, I never added any details about location, people, dates. I was only interested in the images. I’m sorry now. I’d like to know where I took some of the pictures and who some of the people are; I no longer remember. But the truth is most of my books are still primarily focused on the image.

Trouble is a 25 cent purchase

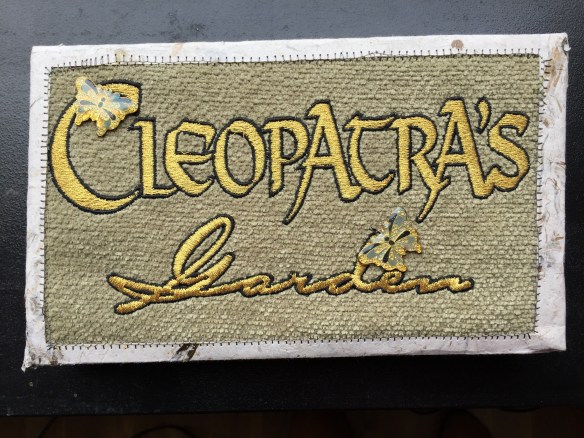
I was going to begin with my earliest books, but I am currently obsessing over book 61 so that’s where I will begin. About a month ago I went to Construction Junction, a Pittsburgh building materials recycler, to get a piece of rusting iron (more about it at another time). There was a time when you could find such a thing on the street. No more; now only plastic. I found what I wanted for fifty cents and then wandered around; they always have interesting things. I found a bin full of what might have been round seat or pillow covers, all in blue with the “Monopoly” logo, like the game. Also in the bin were were olive green fabrics with the beautifully embroidered name, Cleopatra’s Garden.

img_2589I bought two pieces for an additional fifty cents and started on a book. One of my favorite places here in Pittsburgh is Phipps Conservatory. It’s a nice walk from my apartment and I occasionally take pictures. Over the years I’ve accumulated lots of flower pictures with no particular idea in mind. Using Photoshop I removed backgrounds frommum the flowers and made them look somewhat like watercolors, then printed them out and put them in an accordion fold structure.

img_2593

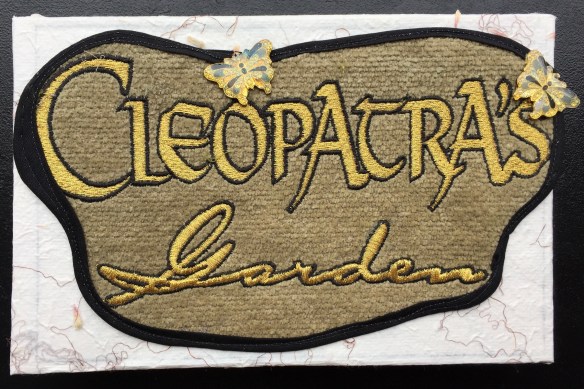
Full of confidence I stitched and glued the butterflies to the embroidery after adding iron-on stiffening to the back, and tried to glue the whole thing to a board. My idea was to put the accordion between two covers and be done with it. This was supposed to be a kind of quick knock-off.

Problem #1. The fabric won’t glue. It must have something on it like a flame retardant or spot retardant. I managed to glue the butterflies but I also stitched them and hadn’t tried to pull them up. (They pull up easily).

Problem #2. I couldn’t wrap the fabric around the board. It was too thick or maybe the board was too thin.

Problem #3. There wasn’t enough fabric in one solid piece to cover the back board.

Problem #4. I was able to glue the accordion to the board but the paper tore when I lifted it. There was not enough support to keep the accordion properly aligned.

These problems didn’t show up as neatly as I wrote them down. Before realizing this wasn’t going to work I went to the local crafts store and spent $7 on ribbons to cover the back pieces and tape to make the accordion. The tape was the only thing I finally used.

After I tore the attached accordion I decided to put the whole thing in a box, which I made from illustration board. I gave up on using the pieced fabric for the box and went back to the crafts shop for some paper; $3.50 on sale. Then I stitched the embroidery to a window in the paper and glued the whole thing to the box. What you can’t see in the photo above is that I turned the embroidery the wrong way. Also made a couple of mistakes when I put the accordion together. In Thailand they make a deliberate mistake in their creations because only God can make a perfect object. I tried to convince myself but three mistakes are too many.

So I have created another accordion and another box. Now I’m trying to figure out how to handle the whole thing. Problem#5, which is really the biggest problem, is the size of the embroidery. It’s actually too large for what I want to do. Still thinking about it.

January 25

Finally finished.

img_2625-1

New box

Made a new box. Bought seam binding and stitched it around the embroidery, then glued and stitched to the paper. I was able to move the butterflies img_2626-1and restitch and glue them in place. They hide a number of stitching sins. The box opens correctly and there is almost enough room for the entire accordion. The last page has a problem, unfortunately. That’s my homage to the Thai gods.

This box is 8.5 x 5.5 x 1.25. If I were to do it again using the 8 x 10 sheets, I would make the box 8.5 x 6 x 1.5 and the cover 9 x 6.125 allowing an overhang on three sides. I hinged the cover using Tyvek inside. I would like to figure out a better hinge so I could open the cover more than 90 degrees.

The week that was

Raja left a comment telling me to go to New York for my spirit. Since I always listen to Raja I'm now on the Megabus heading for New York. Seriously, I've been planning the trip for awhile. One of my Israeli friends whom I haven't seen for a long time will be there and we'll spend a few days together.Last week was busy and good; I continued to feel as well as I did before I took that fall.

Monday evening, six other Osher members and I participated in an undergraduate psychology class. The kids seemed to enjoy hearing our life stories, mostly in 500 words or less, and then told us about papers they had written about elder issues. I was impressed with how varied our experiences were, but I imagine it would be true for most Osher members.

On Tuesday I attended the fourth in a series of talks on preparing for death; this one about hospice and palliative care. I'll miss this week's talk about grieving, but hopefully I've done my share and won't have another turn. The talks all emphasized the importance of talking to your family and your doctor about what you want done at the end of your life. They also recommended a guide called Five Wishes. You can download it here. I've had a healthcare advance directive and living will for many years, but I plan to supplant it with this new document. It makes much more sense to me.

My book-making group will have a holiday party on Sunday, right after I return. The highlight of the festivities is to exchange books with each other. I've been working on mine all last week. I'm not quite finished but I'll have time on Saturday afternoon. The picture of the media delivery box that seemed to be recognizable no matter how I turned it, will be on the cover of a box. Inside will be little one-sheet books with pictures of mosaics that were down the street from the box. I'm calling the box and the little books Burning Box Imager. I'll post pictures when I get home and finish the box.


Update

I went to a real (printing) paper distributor, bought a good card stock and made another book. I made the sides out of single sheets and only laminated the seven bridge sheets. It's much better–not perfect by any means, but much better. Now I'm back to work on the Japanese garden book.

We've had wonderful weather the last few weeks so I've spent a lot of time walking. I like it much better than the health club. I don't know which is better exercise.

I looked at two apartments that just came on the market. One of them has wonderful space but I really can't afford it. So, we'll just forget it. The other would be OK. I'm not in love with it and I really don't want to buy anything for another month or two, so we'll just wait and see what happens.

At the beginning of the month, when the weather became so nice, I met up with another Pittsburgh blogger and we went walking in Frick Park. Nice walk, and I really prefer having company when I walk there, but going alone allows me to take pictures and spend more time just looking.

Here are a few pictures from my second walk in Frick Park.

IMG_2717

IMG_2719

IMG_2720

IMG_2725

The tree below is on the next block when I walk to Frick Park. I don't know anything about it, not even its species or why it grew these great bumps/burls. I'm just pleased no one has cut it down.

IMG_2709

The book is finished

although I plan to do it again. I still want better card stock and better craftsmanship. Here's the book, closed.

IMG_2622
The closure, on the left, is fragile, even worse than I anticipated, so I want to figure out another way to do it.

Back view:

IMG_2623
That's the Allegheny River at the back end of the tunnel. Here is the wrapper opened.

IMG_2627
The same closure works this way, also, finishing the back of the book when it is open. A view from above:

IMG_2628
Photographing this thing is a nightmare. I no longer have proper backdrops or the lighting. Here is the front of the open book with the wrapper loosely encircling it.

IMG_2625
With the two flaps opened you can look into the book. Here you can see four or five of the ten pages.

IMG_2615
Unlike some of the commercial tunnel books much of this one has to be seen from above and as with many other books, each page, or group of pages, has to be seen serially. A few more pictures:

IMG_2614
IMG_2608
IMG_2607

Here is why I want to do it again. Each of the pages should be flat, no curves, with sharp creases and no gaps. 
IMG_2624


Back to the book

Thanks to some good questions from Mage I spent the last week figuring out how to 'package' the book, and how to end it. Remember those flaps sticking out the back end?

IMG_2590

I've started to work from the back. Even with my fancy diagram I'm still making mistakes about the tabbing. Haven't started glueing yet, just cutting, scoring and folding. My brain doesn't want to deal with all of this, but I'm pushing it. Correcting the diagram I found several mistakes confusing things, which I clarified, I hope.

Diagram

Horizontal yellow bars are the pages of the book, joining both sides. Three larger angles are pictures showing the depth of the tunnel, which pull apart to show horizontal structures, the bridges. Thinner, smaller angles are the water feature along the sides of the tunnel.

The rectangle at the bottom of the diagram becomes the wrapper for the book, reversing direction and fastening in the front around the compressed book, which is about one inch thick. The wrapper worries me, because it will fold in both directions, creating possibly destructive wear on the paper hinges.

I began working on the wrapper assembly and glued an additional strip of card over each of the tabs. This made the whole thing too thick and cumbersome. Back to the computer I printed the two small pieces, bottom right, together, eliminating the need for one set of tabs, and reinforced the fold with linen tapes; did all of the first glueing steps working backwards through piece 9; and put everything under weights to dry flat.  I won't continue working on it until I see how everything dries.


Finished, but not done

The book is finished. As usual, I am not happy, so there will be another iteration, this time with design changes based on experience. Usually I'm just speculating. The book, opened out fully, is about three feet long.

IMG_2584
Here is a picture looking through the opening.

IMG_2586
Sorry the pictures aren't better. I didn't set up properly; since I'm going to do it again, I'll worry about good pictures the next time.

I think this is not a tunnel book in the usual sense. It's really a tunnel, of sorts, but you can't see all the way through it unless you open the folded pages.

I've made several decisions about the overall look:

1. I want one more bridge after the second folded page.

2. I will remove the accordion fold next to the cover, connecting it directly to a folded page. Otherwise the whole thing is too loose.

Photo(3)
Above, I clipped the first accordion fold closed.

3. I will be more careful with the outside accordion folds so they will be more closely repetitive, unlike what you see below.

Photo(2)
I will change the back end of the book so that it is a closed sheet or another bridge. This is the one thing that needs a decision.

I want to decrease the number of pieces I have to glue. Unfortunately, even though I can print front and back with reasonable registration, some of the pieces have to be doubled in order to have some place to hide the glue tabs. My first thought was to print the bridges on one sheet, but the card stock is not heavy enough to support the other pages. So, each of the six bridges will be doubled, the three larger accordion folds will be double, and small accordion folds will be single.

I made a diagram:

Diagram

Double lines are glued pages. Single lines with yellow triangles are single accordion folds. Probably makes no sense to anyone else, but I want it as part of my record.

All about glue

or as much as I can bring myself to write. I dislike glue almost as much as all of those details. I'm beginning to develop a technique, but it's still a challenge; either too much or too little.Too much soaks into the paper and you get streaks in solid color areas, like the sky. Too little and there are gaps between the sheets. Here you can see one of those gaps and the blue in the last page is streaked.

IMG_2590
I tend to forget what gets glued to what. This is the second iteration. Each page has been glued to one other page, but when I got to page three I should have glued to two pages, one before, one after, and I forgot the after pages.

IMG_2594
I did it again in the third iteration, but caught it before the glue was entirely set, making for a sloppy joint, but I wanted to see the entire thing put together. I finished on Friday and have spent the weekend trying to figure out how to do it better.

I went over to Staples to look at printers and paper (card) stock, and had a funny experience. The copy center has books of paper samples. When I looked at the samples I knew they had labeled them incorrectly. So I told this to the young man behind the counter. He was very nice and took me over to the paper stock shelves where he opened two different reams and then concluded I was correct. Evidently he had been stung by the mistake and hadn't figured it out. He thanked me for teaching him something. I hope what I really taught him was that old ladies often know what they are talking about. I bought a ream of something they labeled 110 lb. cover, but I don't think it is. It just happens to be the heaviest, brightest stuff they sell. I decided not to get a new printer, but bought more ink instead.

I still have lots of thinking to do. Next post I'll have pictures and the redo plan.


In denial again

this time about not moving. Before I left for New York, thinking I was going to move momentarily, I had packed lots of boxes and thrown out lots of stuff, so generally things were pretty disorganized. I couldn't face the boxes after I signed the new lease, as compensation I started working on version two of that tunnel book. I returned from New York and continued ignoring the boxes.

Photo

Photo
So, this is version two and I'm still not happy. Version three is in the works and the boxes remain in denial.

Version two has a 6×9 inch page considerably larger than the 5×7 of the first one. Also, I have made the accordion sides much larger, even larger in version three. Each revision takes me further from the reality and more into my imagination or to better solutions to the book construction problems, which is where I want to be.

Maybe I'll move boxes over the weekend.

A Going back day

The deliciously cool morning inspired me to walk back to the Jewish Museum to see some things I had missed because we went on a Saturday the first time. There is a wonderful, interactive, computer created tour of the two apartments of the Cone sisters. The tour was created from 37 photos taken within the apartments before the paintings and other collections were given to the Baltimore Art Museum. I was fascinated both by the look of the apartments, much classier and well organized than I expected, and by some of the strange views generated by the computer process. Although I watched for a long time I was never sure I had seen all of it. I tried some of the interactive features: a touch screen and the possibility of asking questions, but mostly I just let it run and watched it.

I went back to the Center for Book Arts, where I had taken Phyllis yesterday. They had a tunnel book in their exhibit and I needed to look at it again. You can see it here, but the picture doesn't really let you see the tunnel part of it or understand how it was constructed. In the exhibit it sat on the light box allowing the depth of the piece and more of what was going on inside to be seen clearly. The two wings fold in toward the proscenium arch; there are at least three layers of images behind the arch, and the enire thing folds up into a bound book. Very inspiring; I was glad I returned to it.

By the way, I found it much easier to walk around today with the cooler weather and probably covered more than 2 miles on foot.

Yesterday, after our visit to the Center for Book Arts, Phyllis and I went to Eataly, an enormous, expensive, Italian-focused, touristy food market/restaurant where I was able to get a walnut, whole wheat bread. Most of the time walnut breads contain raisins or dried cranberries. Every time I find a new bakery I look for walnut breads–only walnuts, no raisins or cranberries. I first discovered this in France, subsequently found it in Montreal, and a small restaurant in Eagle, Wisconsin, long gone, and, of course, other parts of Europe. It was lovely to find it here. I may go back tomorrow to get another one to take home with me.