Amazing how quickly time passes

All the books were finished in October, but I didn’t get my copies until the middle of December.

Here is a picture I received in October of the finished books.

WSW celebrated its 50th anniversary in November, which accounts for the delay. As a recent resident I was mentioned and pictured in some of their promotional material. The local NPR station, WAMC, published a story here. HYPERALLERGIC published a long piece here and used my picture at the top.

HYPERALLERGIC made me 2 years older and WAMC went down a rabbit hole about older women being invisible, which had nothing to do with my book. Unfortunately WSW went down the same rabbit hole but also gave me a nice write-up here.

In the meantime I visited the Newberry Library and found a book structure I want to use. Not sure exactly what I want in it, but I’m stuck on how to make it. I’ve looked at it and photographed it three times at the library but I will have to make at least one more visit. More about this latest obsession next time.

What’s next?

Most of the work to bind the book will be done by someone other than me. Each of those sheets are about 70 inches long and have four books printed on them. There are 15 sheets plus three test sheets. The sheets will be cut by hand. None of the mechanical cutters is long enough to take the entire sheet.

The finished book will be an accordion inserted into a folded, diecut cover. After the first cut is made the sheets will be scored to insure the folds are made at the proper distances.. All of this will be done by hand–a huge amount of work. After scoring each sheet will be cut again by hand in the long direction. Finally the books will be folded and trimmed. I will not be doing any of this. All of it will be done by the wonderful people at the Women’s Studio Workshop.

Most of my work was done before I came to the Workshop. I created the pictures and I hand wrote the captions. Now I am here to make decisions: the color of the paper, the color of the ink and the picture used on the cover. I created a line drawing from one of the photos but we are not sure it will work. The cover will be letterpress printed and the plate requires a particular kind of image. I don’t have an answer on that yet.

I will also be signing each book. We are hoping for a yield of fifty books. The thought of signing my name fifty times is daunting. Each book will also be numbered and a record kept of the purchaser or recipient.

Sometimes Amazing Things Happen

The Women’s Studio Workshop in Kingston, New York, noted for publishing artist’s books, is publishing one of my books. I am amazed this is happening, that I am here for a residency, that anyone is paying attention to this old lady. We did half of the work online. planning the book, deciding which pictures to use in what order and finally I hand wrote the captions. The inside of the book was printed and we picked it up today. Now for the cover.

My images with Chris Petrone from WSW, who will do all the cutting, folding and cover-making.

The book is finished

although I plan to do it again. I still want better card stock and better craftsmanship. Here's the book, closed.

IMG_2622
The closure, on the left, is fragile, even worse than I anticipated, so I want to figure out another way to do it.

Back view:

IMG_2623
That's the Allegheny River at the back end of the tunnel. Here is the wrapper opened.

IMG_2627
The same closure works this way, also, finishing the back of the book when it is open. A view from above:

IMG_2628
Photographing this thing is a nightmare. I no longer have proper backdrops or the lighting. Here is the front of the open book with the wrapper loosely encircling it.

IMG_2625
With the two flaps opened you can look into the book. Here you can see four or five of the ten pages.

IMG_2615
Unlike some of the commercial tunnel books much of this one has to be seen from above and as with many other books, each page, or group of pages, has to be seen serially. A few more pictures:

IMG_2614
IMG_2608
IMG_2607

Here is why I want to do it again. Each of the pages should be flat, no curves, with sharp creases and no gaps. 
IMG_2624


Back to the book

Thanks to some good questions from Mage I spent the last week figuring out how to 'package' the book, and how to end it. Remember those flaps sticking out the back end?

IMG_2590

I've started to work from the back. Even with my fancy diagram I'm still making mistakes about the tabbing. Haven't started glueing yet, just cutting, scoring and folding. My brain doesn't want to deal with all of this, but I'm pushing it. Correcting the diagram I found several mistakes confusing things, which I clarified, I hope.

Diagram

Horizontal yellow bars are the pages of the book, joining both sides. Three larger angles are pictures showing the depth of the tunnel, which pull apart to show horizontal structures, the bridges. Thinner, smaller angles are the water feature along the sides of the tunnel.

The rectangle at the bottom of the diagram becomes the wrapper for the book, reversing direction and fastening in the front around the compressed book, which is about one inch thick. The wrapper worries me, because it will fold in both directions, creating possibly destructive wear on the paper hinges.

I began working on the wrapper assembly and glued an additional strip of card over each of the tabs. This made the whole thing too thick and cumbersome. Back to the computer I printed the two small pieces, bottom right, together, eliminating the need for one set of tabs, and reinforced the fold with linen tapes; did all of the first glueing steps working backwards through piece 9; and put everything under weights to dry flat.  I won't continue working on it until I see how everything dries.


Japan artist book FINISHED

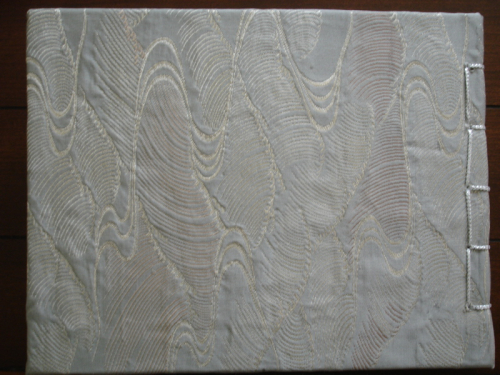
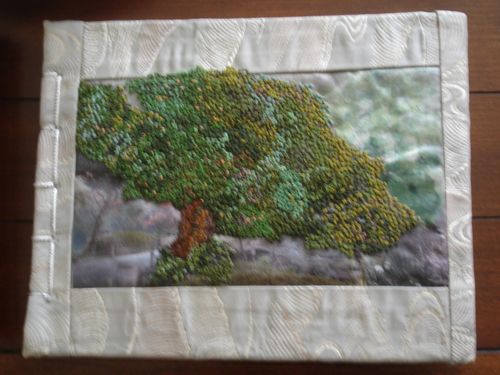
If you think it's the greatest bit of prose ever written, get rid of it. That's common advice to writers and probably should be given to artists also. I fell in love with the idea of embroidering this tree on a piece of obi silk, and using it as a book cover. I spent all summer working on it. I should have just tacked it on the wall; the book would be better bound with something else.

DSC04097

So I'm not happy. Actually, I'm never happy with my finished work. Sometimes after it sits for months or years I like it better. We'll see about this one. 

So that I remember, and you learn, I'll tell you what's in my head. First, putting a photo transfer on silk is not a great idea. I said that before, but now I have another reason: making it into book cloth didn't work. The fusible interfacing never fused properly. I had lots of trouble with glue coming through and you can see the lumps and bumps because of the lack of proper fusing. 

Second the silk cloth is really too
thick, even though the glue came right through it. Folding it under to
make sure it didn't ravel made it too thick. I probably should have
just cut it and used some kind of fabric stablizer. This fabric was machine
embroidered on what would have been the right side of the obi and the
threads are carried loosely along the back as the color and pattern
changes.

DSC04099

I used archival foam board instead of the more commonly used davey board. It's much easier to cut. I made a mistake there also. Instead of cutting that 1/4" piece for the binding edge, and moving it 1/4" away from the large piece, I left it attached on one side just cutting away the inside foam and the other side. After I finished the binding it was still too stiff. It doesn't open as nicely as my earlier books.

I had trouble finding a good, heavy binding cord. My preferred cord is waxed, linen carpet thread; not beautiful enough for all that embroidered silk. I tried several other kinds of cords, none of which worked. In desperation I went to Michael's (not a lot of choice here in Pittsburgh) and got this silvery stuff. It pulled tight and did the job, but I don't like it. Finally, I had trouble drilling the holes and the back holes don't line up properly. The whole thing was too thick, but probably would have been better if I had used that 1/4" space technique.

DSC04100